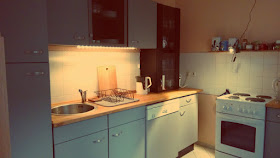
Today I’m
sharing part two of my kitchen upgrade. I’m so happy with the outcome and the
whole room just feels very different!
Here’s a
before picture: you can see that the kitchen originally was very colorful. In
my opinion the colors didn’t match to the wallpaper and they also didn’t really
go well with each other. I just knew right away I had to somehow change this.
I remembered
I had heard something about adhesive furniture foil and after a quick google
search I found what I needed: an adhesive furniture foil explicitly for kitchen
cabinets. As I didn’t wanted to paint the walls I was looking for a color that
would match the apricot walls and would also work with the glass elements. I
decided on a light gray and the matt version of the foil – if you go for the shiny
version keep in mind that you can see finger prints etc on it.
Besides
getting the foil I also bought a spatula which was recommended for the
installation process. I was super motivated and immediately started working: I
measured a cabinet, added 2in (3cm) on each side to make sure I can cover the sides
and have a little bit extra, I cut the foil, cleaned the surface and started
installing it using the spatula to get rid of the excess air underneath the
foil. And it was just a disaster! Small bubbles everywhere. I tried to get rid
of the air bubbles by using more pressure but then the spatula scratched the
foil :(
So after
covering one cabinet I stopped and thought “what have I gotten myself into???”.
Obviously giving up wasn’t an option as I really wanted to get rid of all those
colors. Also I had set my mind on covering the cabinets and my mind doesn’t let
go that fast ;)
So the next
day I did what I should have done the first time: I looked on YouTube and guess
what, there are so many videos explaining different techniques to install
adhesive foil! I decided to try out the ‘water technique’. It worked so well!
Unfortunately
I didn’t document the process step by step. To sum it up: you still do
everything I explained before just before sticking the foil to the cabinet you
spray the cabinet with water and you also spray some water on the sticky side
of the foil. The water film helps to adjust the foil and when pressing all the
water out using the spatula all the extra air is removed as well, so no more
air bubbles!
And this is what the ‘new’ kitchen looks like! It definitely was some work but also a lot of fun and I only spend around $40!
What do you think?


